Page History
...
A public demo of this bundle is available at the following URL:
{+}http://shrine-node3.i2b2transmartbundles.org/shrine-api/shrine-webclient/+
Log in with the user demo and password demouser.
It consists of a 3-node SHRINE with Synthea demo data.
...
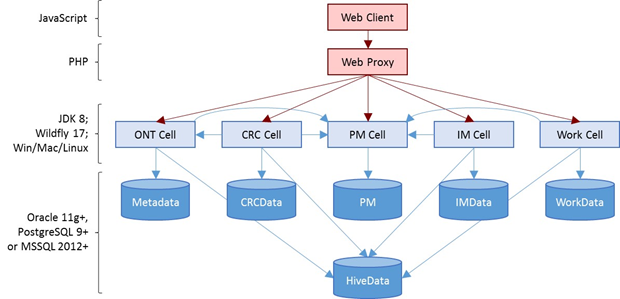
i2b2 consists of independent applications that provide different functionality called "cells" (Figure 2). A collection of cells form an i2b2 "hive". Most i2b2 hives include (1) a Project Management (PM) cell for authentication and authorization; (2) a Clinical Research Chart (CRC) cell, which contains patient data and the query engine; and, (3) an Ontology (ONT) cell, which describes the concepts and codes contained within the CRC cell. Many i2b2 hives also include (4) a Workplace (Work) cell, which enables users to "bookmark" frequently used items in the user interface and share these with collaborators; and (5) an Identity Management (IM), which allows authorized users to retrieve identified patient data. Cells communicate with each other using i2b2 XML messages sent to APIs. When a cell receives a request message, it queries a table in the HiveData database to determine the location of the main database for that cell, based on the user's project. An exception is the PM cell, which uses a single database for all projects. The i2b2 Web Client is written entirely in HTML and JavaScript. It communicates with a Web Proxy on a web server, which redirects messages to the appropriate cell.
Figure 2. i2b2 components.
...
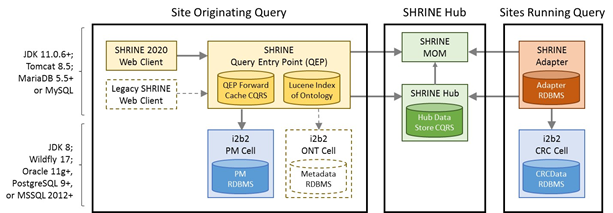
The SHRINE software consists of several parts (Figure 3). (1) At the site where investigators are forming queries (the Site Originating Query), there is a SHRINE Web Client and a SHRINE application called the Query Entry Point (QEP). The QEP authenticates the user, provides the Web Client with access to the ontology, sends queries to the SHRINE Hub, and polls the hub for results from sites. In SHRINE Version 3.0, the QEP does not have any dependencies on i2b2, except for using the i2b2 PM cell for authentication. It copies the ontology into a Lucene index to enable fast searches for concepts. In older versions of SHRINE, the Legacy Web Client used the i2b2 ONT cell to access the ontology. (2) The SHRINE Hub includes the main hub software and database that contains the configuration settings for the network. It also contains a Message-Oriented Middleware (MOM) component to support asynchronous communication across sites. (3) The sites that are running the queries and returning aggregate counts contain a SHRINE Adapter. This polls the SHRINE MOM for new queries and runs them on an i2b2 CRC cell. (This CRC cell also requires a PM and ONT cell to run, but these are not shown in the figure.) Usually sites that are running queries also have investigators that are forming queries. These sites have a single i2b2 instance along with the SHRINE Web Client, QEP, and Adapter.
Figure 3. SHRINE components.
...
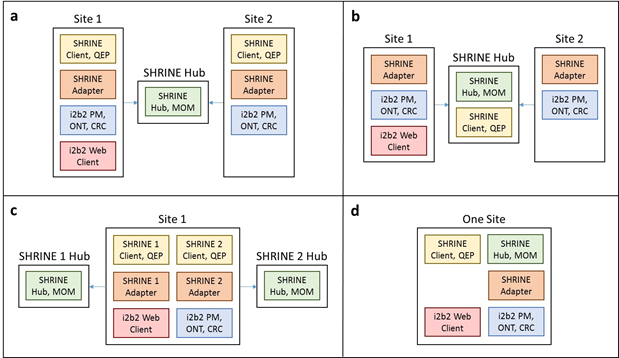
The i2b2 and SHRINE components can be combined in different ways (Figure 4): (a) Most commonly, they are used to form a federated network, with a central SHRINE Hub, and each hospital having the items needed to both send queries to the network and respond to queries from other sites. Some sites also use the i2b2 Web Client to perform local queries that are not sent to other institutions. (b) An alternative approach is to use a central SHRINE Web Client and QEP. This simplifies the architecture of the network, but it requires sites to send their investigators to an external website to run queries, which might not be possible. (c) The same i2b2 instance at a site can participate in multiple networks by installing a SHRINE Adaptor for each network. (d) A single site can create a one-node network if they want to use the SHRINE Web Client as an alternative user interface for i2b2.
Figure 4. SHRINE configurations. (a) Federated network with a SHRINE Web Client at each site. (b) A centralized SHRINE Web Client. (c) A site participating in two SHRINE networks. (d) One site using the SHRINE Web Client as an alternative user interface for i2b2.
...
| Anchor | ||||
|---|---|---|---|---|
|
We have developed several Youtube tutorial videos that parallel the installation steps below.1.
- Install i2b2:
...
...
...
- PostgreSQL ACT Ontology:
...
...
...
- Synthea COVID19:
...
...
...
- SHRINE Node:
...
...
| Anchor | ||||
|---|---|---|---|---|
|
There is a public demo of i2b2 available at {+}https://www.i2b2.org/webclient/+
- The latest version of i2b2 that is certified to work with SHRINE is v1.7.12a (as of 10/19/20).
- See compatibility matrix at
- Download:{+} +
- Binary distribution and quick install guide, under
- “download binary
- distribution”
- Or, download the source code from the same page.
- Follow the quick install guide (on {+}https://www.i2b2.org/software/index.html+) or the detailed install guide ({+}httpshttps://community.i2b2.org/wiki/display/getstarted/i2b2+Installation+Guide+). There are 3 components:
- Data (Chapter 3). Install the i2b2 database on MSSQL, Oracle, or Postgres. This provides many metadata tables for querying and authentication, as well as the actual core data tables.It is essential to configure i2b2 with the ACT ontology, to be compatible with the current SHRINE 3.0 bundle. When installing i2b2 data, follow the instructions in the next section on installing the ACT ontologythe ACT ontology.
- Data (Chapter 3). Install the i2b2 database on MSSQL, Oracle, or Postgres. This provides many metadata tables for querying and authentication, as well as the actual core data tables.
- Server (Chapter 4). A Java program that runs in the Wildfly container which provides an API and data analytic methods on the database. It is divided into components called cells. SHRINE uses some of these cells: CRC to communicate to the database, ONT to provide the query ontology, and PM to manage authentication.
- Webclient (Chapter 5). A web interface to i2b2, which is not required for SHRINE but could be useful for local querying and testing (SHRINE is network-only)
| Anchor | ||||
|---|---|---|---|---|
|
There is a public demo of the ACT ontology in i2b2 available at. {+}https://dbmi-ncats-test01.dbmi.pitt.edu//webclient/+
- 1. Install the ACT ontology (Metadata install). When installing the data for i2b2, each data installation script must have a db.properties file configured. A demo project with the ACT ontology can be installed by the i2b2 installer by simply changing changing db.project from demo to ACT in the Metadata and PM db.properties files. The Metadata install will install the ontology. See the documentation here ({+}https://community.i2b2.org/wiki/display/getstarted/3.7.2+Set+Database+Properties+)
- 2. Create an ACT project and add users to the project (Pmdata install). Repeat the above process with the db.properties file for the Pmdata. This will create the ACT project and add AGG SERVICE account and ACT user to the project. See also the documentation here: {+}https://community.i2b2.org/wiki/display/RM/1.7.12a+Release+Notes#id-1.7.12aReleaseNotes-act-ontolog+)
- 3. Add new dblookup rows (Hivedata install - happens always, no specific configuration needed) The hivedata for the ACT project (including CRC, Ontology and workplace) is inserted automatically when performing hivedata install. No specific configuration is needed. Or, this can be done manually, per the previously-referenced instructions: {+}https://community.i2b2.org/wiki/display/RM/1.7.12a+Release+Notes#id-1.7.12aReleaseNotes-act-ontolog+
- 4. Manually update the ACT user password from demouser to something more secure.
- 5. Update to latest version of ACT ontology (optional). The ACT ontology included in i2b2 is for demonstration purposes and might not be the latest. The latest version in production is available from {+}https://dbmi-pitt.github.io/ACT-Network/ontology.html+ (see "Ontology Installation" and "COVID“Ontology Installation” and “COVID-19 Ontology"Ontology”
- 6. Synthea demo data (optional). The i2b2-synthea data set provides some demo data in the ACT format that can also be installed. An alpha version of the i2b2-synthea data is available here: {+}https://github.com/i2b2/i2b2-synthea+
| Anchor | ||||
|---|---|---|---|---|
|
The SHRINE 3.0 install guide can be found here: {+}https://open.catalyst.harvard.edu/wiki/display/SHRINE/SHRINE+3.0.0+Installation+Guide+
It is divided into 14 chapters. Some notes on the steps for install are shown below:
- Chapters 1-5: Install JDK 11 (Java), Tomcat (the application server), and setup Tomcat to start automatically
- Chapter 6: Install MariaDB (a variant of MySQL), the SHRINE database (6.1), and configure database connections (6.2). Alternatively MSSQL or Oracle can be used but are not as well-supported.
- Chapter 7: Install the SHRINE software (.war file) into the Tomcat server.
- Chapter 8 and 9: Configuration.
- Create the shrine.conf config file in Tomcat.
- Create the i2b2 users.
- In shrine.conf:
- Set the URLs for the Hub and i2b2 connections.
- Set the nodeKey, which is just a short name for the node.
- Set the i2b2 hive credentials.
- Set a location/name for the keystore.
- Configure the data steward (chapter 9).
- Chapter 10: Install the ACT ontology. Because this was done when setting up i2b2, only step 10.2 (install the AdapterMappings file) is needed. Because the AdapterMappings file is generally not modified by local installations, this step is just to install a version of the file that maps the SHRINE version of the ACT ontology to the i2b2 version.
- Chapter 11: Optional step of changing the i2b2 "domain" so it is easier to determine the node from which queries originated.
- Chapter 12: Certificate exchange.
- The steps are, for each node:
- Generate a keystore (Chapter 12.0)
- Use the password and node name from your shrine.conf
- Create a certificate signing request (Chapter 12.1)
- Import the Hub CA certificate. Load each node's SHRINE CA certificate and CSR and sign the CSR. (Chapter 12.2)
...
- Chapter 6: Additionally create Hub database tables in 6.3 - {+}https://open.catalyst.harvard.edu/wiki/display/SHRINE/SHRINE+3.0.0+Chapter+6.3+-+Additional+Tables+for+the+Hub+Database+
- Chapter 8: Additionally perform the other Hub configuration steps in 8.4 - {+}https://open.catalyst.harvard.edu/wiki/display/SHRINE/SHRINE+3.0.0+Chapter+8.4+-+Configuring+a+Hub+
- Chapter 12: Certificate exchange. The steps for certificates at the Hub are different from the nodes.
- Generate a CA certificate and distribute to all nodes
- Collect each node's CSR, sign them, store them in the local keystore, and distribute them back to the nodes.
- Example code to sign a CSR:
easyrsa import-req /tmp/shrine-node3.csr shrine-node3
Easyrsa sign-req server shrine-node3
- Chapter 13: Additional steps to add nodes to the hub
- A firewall port must be opened to the Hub's base URL
- When this is successful, nodes will be able to curl the Hub as in the first step in Chapter 13
- See the two "curl' commands listed as for Hub administrators
- A firewall port must be opened to the Hub's base URL
...


